If you cannot see your Laser or it’s dim, you might need to clean or replace it. Follow the steps below.
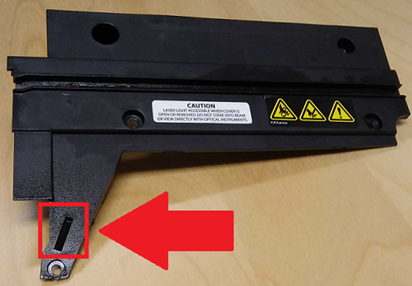
WARNING!!! DO NOT allow the laser beam to be aimed at yours or anyone else’s eyes. The laser emits a very concentrated light beam that can cause permanent blindness. Use extreme care in handling the laser assembly to make sure it is not going to be inadvertently aimed at someone’s eyes or face. DO NOT LOOK DIRECTLY AT THE LASER LENS WHILE IT IS ENERGIZED!
1. Make sure your Grabber Blade is toggled out.

2. If you can see the laser clearly on Needle #1 and #2 but cannot on all other needles, make sure the screw for the Upper Arm Cover is fully tight. If tightening the screw doesn't fix the issue, follow the steps for Laser Is Not Centered.

3. If you are having problems seeing the laser on Needle #2 skip to the next step.

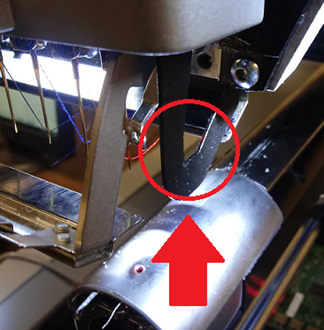
If you are having problems seeing the laser on Needle #1, but can see it clearly on other needles, the Grabber Trap is blocking the laser.

To confirm you will need additional technical assistance. Here are the available Melco Technical Support options. The ‘Trap Upper Assembly’ might need to be adjusted or replaced. For the EMT16Plus this is the part number: ‘32004 Trap, Upper, Assembly’. For adjusting the laser follow steps 18 through 20. Loosen the screws for the Laser Mounting Block and continue with step 26.
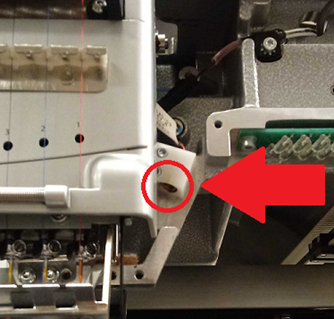
4. If you are having problems seeing the laser on any needle, color change to Needle #1
and try spraying canned air into the Angled Slot on the Upper Arm Right Front Cover. Then, check if you can see the laser.
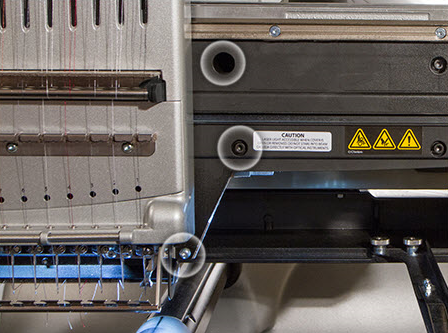
Upper Arm Right Front Cover
5. Push in the Emergency Stop Button, the light on the Keypad should be solid red. For the following steps, it is important your machine does not move.

WARNING!! If your machine color changes without the Right Upper Arm Front Cover, damage to your machine will occur and a service call will be necessary, Melco will not be responsible for any damage to the machine or related service costs caused by not performing this step.
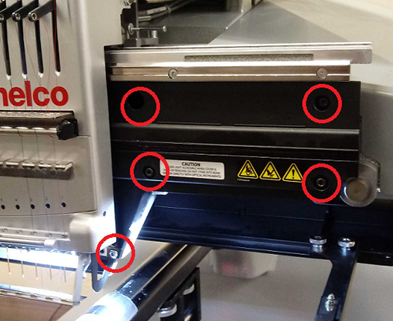
6. Remove the Upper Arm Right Front Cover. It’s attached with 5 screws.

7. Gently clean the lens of the Laser with a paper towel, soft cloth, or Q-tip.
8. With a piece of paper or white backing on the Needle Plate hole, check if you can see the laser using the Laser button on the keypad.

9. Reinstalled the Upper Arm Right Front Cover with its 5 screws. It is important to leave them just loose enough that the cover can still move, but make sure that the screws are far enough in that they will not catch the Needlecase as it moves over them.
10. With a piece of paper or white backing on the Needle Plate hole, check if you can see the laser using the Laser button on the keypad. If you could see the laser for step 7 but cannot for step 9 you have a dirty or damaged Upper Arm Right Front Cover. Inspect the cover and clean it before reinstalling.

WARNING!! If you proceed without mounting the right upper arm front cover, damage to your machine will occur and a service call will be necessary, Melco will not be responsible for any damage to the machine or related service costs caused by not performing this step.
11. Release the Emergency Stop Button.

12. Color change to needle #12.
13. Tighten the two screws on the right side of the Upper Arm Right Front Cover.
14. Color change to needle #1.
15. Tighten the three remaining screws on the left side of the Upper Arm Right Front Cover.
16. Check the laser on needle #2, if you can see it clearly skip the remaining steps.
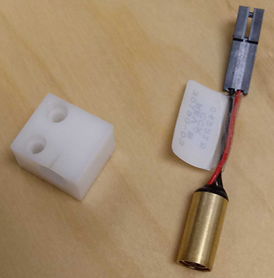
17. If you still cannot see the laser you will need to replace Laser Assembly 1.0" PN# 30190-03. Once you have a new laser return to this article and continue with the steps below.
18. Make sure your Melco machine is on and color change to Needle #1.
19. Push in the Emergency Stop Button, the light on the Keypad should be solid red. For the following steps, it is important your machine does not move.
WARNING!! If your machine color changes without the Right Upper Arm Front Cover, damage to your machine will occur and a service call will be necessary, Melco will not be responsible for any damage to the machine or related service costs caused by not performing this step.
20. Remove the Upper Arm Right Front Cover. It’s attached with 5 screws.
(If you are following the steps for Grabber Trap blocking the laser; Loosen the screws for the Laser Mounting Block and skip to step 26.)
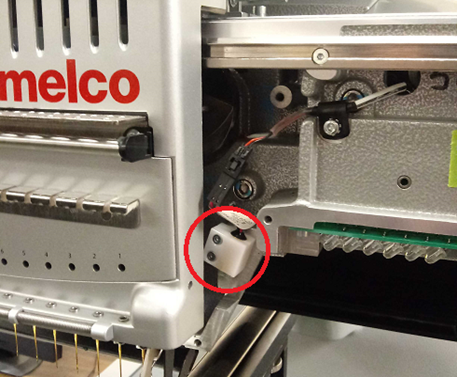
21. Unplug the Laser.
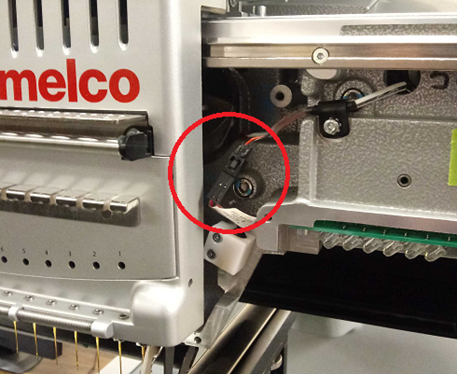
22. Remove the Laser Mounting Block by taking out its two screws.
23. Replace the new Laser into the Laser Mounting Block.
24. Screw the Laser Mounting Block back onto the machine leaving the screws loose enough to adjust the mounting block.
25. Plug the Laser in.
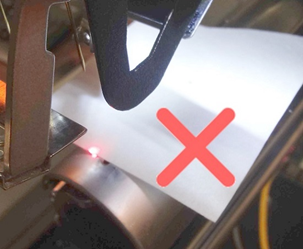
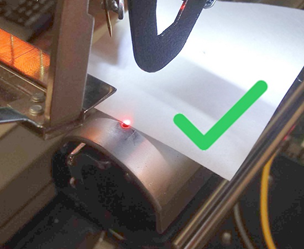
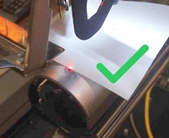
26. Align the Laser to the needle plate hole using the Laser button on the Keypad. Use a piece of paper or backing and place it over half of the needle plate hole. If you cannot see the laser turn the Mounting Block clockwise.


If you still cannot see the laser after turning the Mounting Block clockwise, you might need a new Mainboard / PCB. You will need additional technical assistance to confirm this. Here are the available Melco Technical Support options.
27. Tighten the two screws for the Laser Mounting Block. If you are unable to set them to Torque Specifications, pay close attention to not over tighten the screws.
28. Double check the laser alignment, re-adjust if needed.
29. Reinstall the Upper Arm Right Front Cover with its 5 screws. It is important to leave them just loose enough that the cover can still move, but make sure that the screws are far enough in that they will not catch on the needlecase as it moves over them.
30. WARNING!! If you proceed without mounting the right upper arm front cover, damage to your machine will occur and a service call will be necessary, Melco will not be responsible for any damage to the machine or related service costs caused by not performing this step.
31. Release the Emergency Stop Button.
32. Color change to needle #12.
33. Tighten the two screws in the right side of the Upper Arm Right Front Cover.
34. Color change to needle #1.
35. Tighten the three remaining screws on the left side of the Upper Arm Right Front Cover.
36. Laser replacement is now complete.